Take Back Control of Your Data: A Guide to Syncthing for Secure Mobile Backups and P2P Sharing over LAN/Internet
Stop relying on centralized cloud giants. Learn how to use Syncthing for private, encrypted, and free P2P file synchronization. This guide covers setting up secure mobile backups and sharing large files over LAN or the internet without storage limits.
Author
Viruchith Ganesan
We live in an era dependent on cloud giants. When you take a photo on your phone, it automatically flies off to Google Photos or iCloud. When you need to send a 4GB video file to a colleague, you upload it to Dropbox and email a link.
While convenient, this reliance on centralized clouds comes with downsides: privacy concerns, storage limits that require monthly payments, and slow upload speeds limited by your ISP.
What if there was a way to cut out the middleman? What if your phone could wirelessly back up directly to your laptop whenever they were near each other, and you could beam massive files to another device as fast as your Wi-Fi router allows?
Enter Syncthing.
What is Syncthing?
Syncthing is a free, open-source application designed to synchronize files between two or more computers in real-time.
Unlike Dropbox or Google Drive, Syncthing does not store your data on a central server. Instead, it connects your devices directly to each other using Peer-to-Peer (P2P) technology. Your data moves directly from Device A to Device B, fully encrypted, never resting on a third-party computer.
It is available for Windows, macOS, Linux, Android, and various NAS systems. (Note: iOS support is limited due to Apple’s operating system restrictions, though third-party wrappers exist).
The Advantages of Using Syncthing
Before diving into the “how-to,” it is crucial to understand why you would choose this route over traditional cloud storage.
-
Ultimate Privacy and Security: Your data does not live on someone else’s server. It resides only on the devices you own. All communication is secured using TLS encryption, and every device is identified by a strong cryptographic certificate. Only devices you explicitly allow can connect to yours.
-
No Storage Limits or Fees: Cloud services usually offer 5GB or 15GB free, then charge monthly fees. Syncthing’s limit is simply the size of your hard drive. If you have a 2TB drive on your laptop, you have a 2TB personal backup cloud—for free.
-
Blazing Fast Local Transfers (P2P): When sharing large files between devices on the same network (e.g., copying phone photos to your laptop over home Wi-Fi), Syncthing is incredibly fast. It doesn’t need to upload to the internet first; it uses maximum local network speed.
-
Automatic “Set It and Forget It”: Operation Once configured, Syncthing works in the background. As soon as you take a photo and your phone connects to Wi-Fi, it starts syncing to your laptop without you pressing a button.
-
Resilience (Decentralized): There is no central server to go down. As long as your two devices are turned on and have some form of network connection, they can sync.
Use Case 1: The “Anti-Theft” Mobile Backup
This is the most popular use for Syncthing. The goal is to automatically copy every photo, video, and document from your phone to your laptop whenever they connect. If your phone falls into a river or gets stolen, your data is safe at home on your computer.
Prerequisites
Laptop/Desktop:
- Download and install Syncthing from the official website.
- Android Phone: Download the app from the Google Play Store or F-Droid.
Step 1: Introduce the Devices Syncthing uses unique “Device IDs” to connect. You need to tell the laptop to trust the phone, and the phone to trust the laptop.
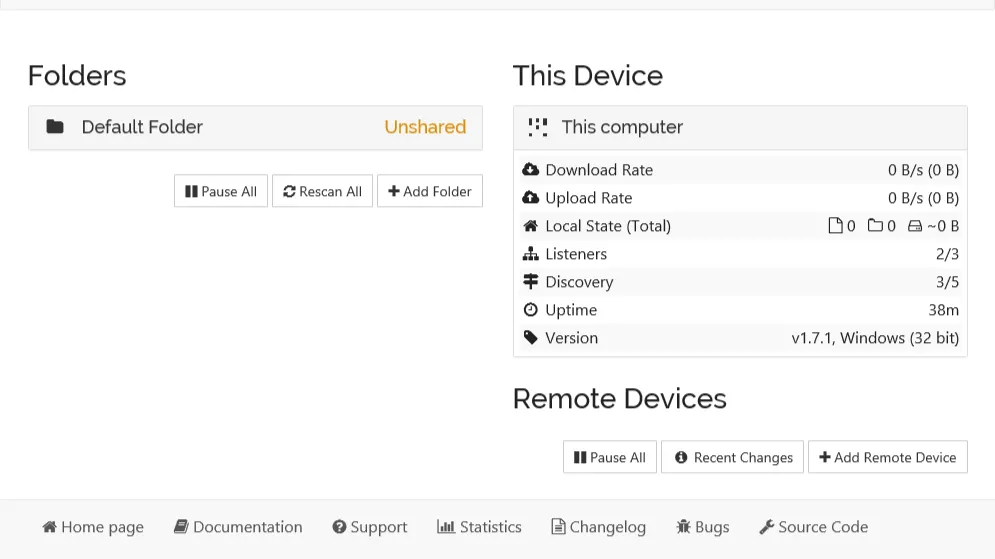
- On the Laptop: Open Syncthing (it usually opens in a web browser at localhost:8384). Click “Actions” in the top right -> “Show ID”. A QR code will appear.
- On the Phone: Open the Syncthing app. Tap the “Devices” tab. Tap the ”+” symbol in the top right.
- Tap the QR code icon to scan the code on your laptop screen. Name the device (e.g., “Home Laptop”) and save.
- Back on the Laptop: A pop-up will appear shortly saying a device wants to connect. Click “Add Device.” Name it (e.g., “My Pixel Phone”). Don’t share any folders yet. Click Save.
Your devices are now linked.
Step 2: Configure the Phone Folder (The Source)
We want to back up the phone’s camera roll.
- On the Phone: Go to the “Folders” tab. You might already see a default “Camera” folder detected. If not, tap ”+” to add one.
- Give it a label (e.g., “Phone Camera Backup”).
- Tap “Directory” to browse to your DCIM/Camera folder (where photos usually live).
- CRITICAL STEP - Folder Type: Tap “Folder Type.” Change this to “Send Only”.
- Toggle the switch for your linked laptop device so it knows where to send the data. Tap the checkmark to save.
Step 3: Configure the Laptop Folder (The Destination)
- On the Laptop: Within a minute, a pop-up will appear: “Device ‘My Pixel Phone’ wants to share folder ‘Phone Camera Backup’.” Click “Add.”
- You will see the folder configuration screen. Look at “Folder Path.” Choose where on your laptop you want these photos to live (e.g., C:\Users\Name\Pictures\PhoneBackup).
- CRITICAL STEP - Folder Type: Click the “Advanced” tab. Change the “Folder Type” to “Receive Only”.
- Click Save.
Result: Your phone will immediately begin pushing its photos to your laptop over your local Wi-Fi network.
Use Case 2: P2P Sharing of Large Files Over the Internet
This scenario is ideal if you need to send a 50GB project folder to a colleague in a different city, or share a folder of high-res family videos with a relative across the country.
The Mechanism: Syncthing uses a system called Global Discovery to let devices find each other without manual IP addresses. If a direct connection is blocked by strict firewalls, it will fallback to using Relays (secure, encrypted traffic bouncing off a volunteer server) to ensure the data still gets through.
Step 1: Securely Exchange Device IDs
Unlike local sharing where you can scan a QR code easily, your partner is remote.
- You (Sender): Open Syncthing, go to “Actions” -> “Show ID”. Copy the long alphanumeric string. Send this to your partner via a secure messenger (Signal, WhatsApp, etc.).
- Partner (Receiver): Open Syncthing, click “Add Remote Device,” and paste your ID.
- The Handshake: You will get a notification that a device wants to connect. Click “Add Device.”
- Verification: Verify the first few and last few characters of the Device IDs to ensure you are connecting to the right person.
Step 2: Create and Share the Folder
- You (Sender): Create a new folder in Syncthing (e.g., “Paris_Vlog_Raw_Footage”). Point it to the directory containing your large files.
- Sharing: In the folder settings, check the box for your Partner’s device.
- Versioning (Optional but Recommended): In the “File Versioning” tab, select “Trash Can File Versioning.”
- Partner (Receiver): They will receive a notification to accept the folder. They must choose a location on their local drive with enough free space to accept the incoming data.
Advantages of Internet P2P Sharing
- Bypassing File Size Caps: You are not limited by the 25MB email limit or the 2GB WeTransfer free limit. You can sync terabytes if needed.
- Resumable Transfers: If your internet cuts out at 99%, you don’t have to restart the upload from zero. Syncthing will verify what blocks are missing and resume exactly where it left off once the internet returns.
- End-to-End Encryption: Even though the data is traveling over the public internet (and potentially through relay servers), it is encrypted with TLS. No one—not your ISP, not the relay server owner, and not the Syncthing developers—can see your files.
- Version Consistency: Unlike sending a zip file, if you edit a document inside the folder, the changes are synced to your partner automatically. You are always looking at the same version of the files.